 Save
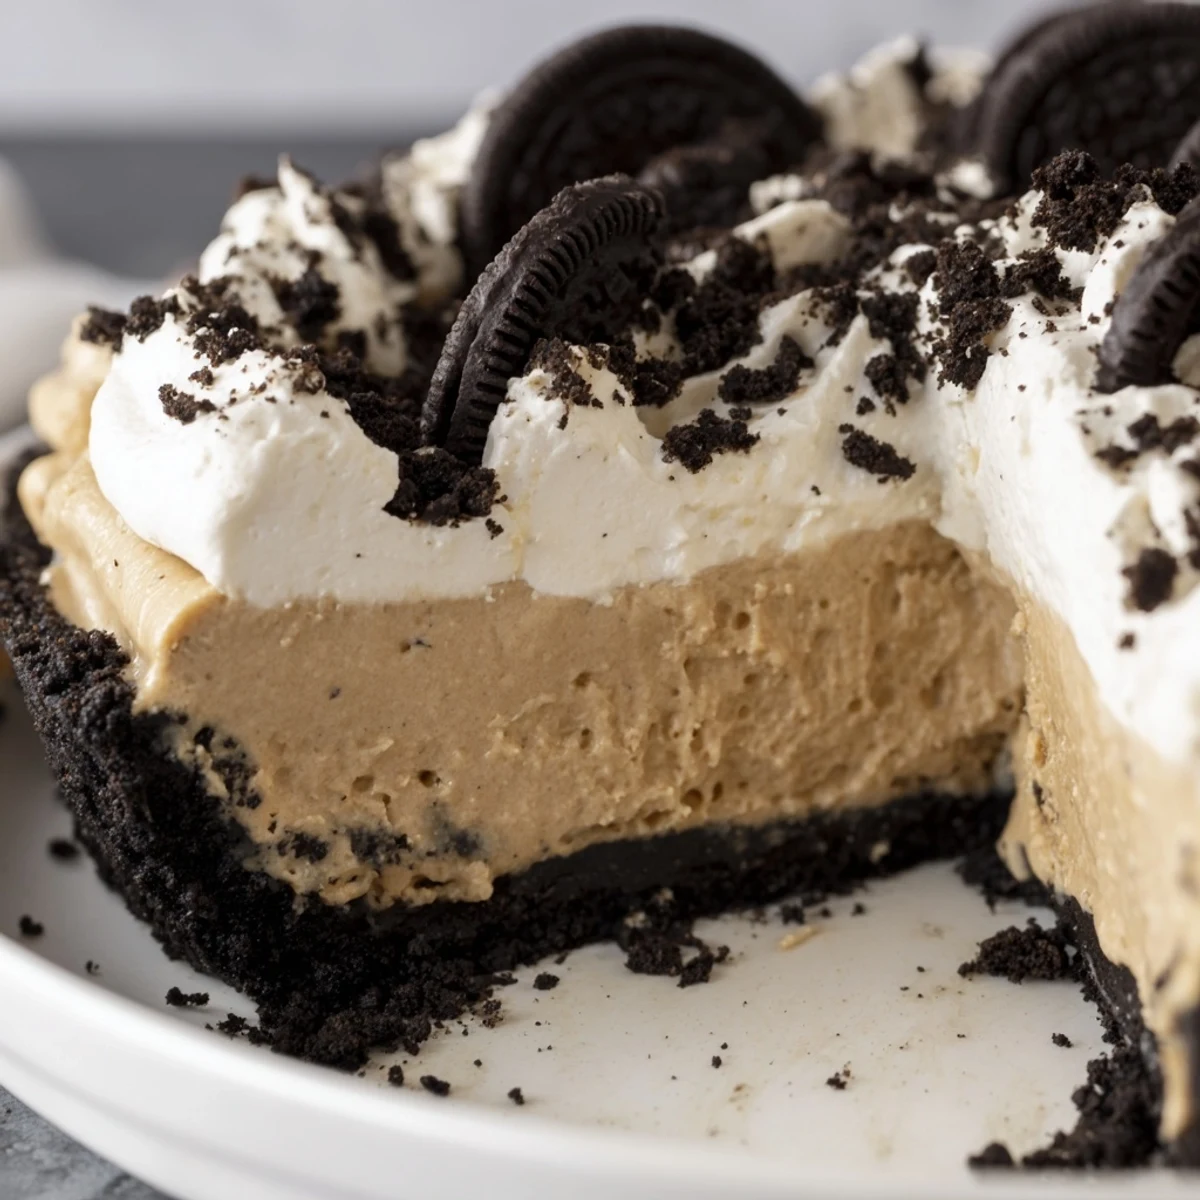
Save This indulgent dessert combines the best of both worlds—creamy peanut butter filling and crunchy chocolate Oreo crust. The preparation comes together in just 20 minutes, though you'll need to plan ahead for the 3-hour chilling time to achieve that perfect sliceable consistency.
The process starts with crushing whole Oreos into fine crumbs, mixing them with melted butter, and pressing into a pie dish for a quick 10-minute bake. Meanwhile, the silky filling blends creamy peanut butter with softened cream cheese and powdered sugar, lightened with freshly whipped heavy cream.
After spreading the luscious peanut butter mixture into the cooled crust, a few hours in the refrigerator transforms it into a firm yet creamy delight. A final layer of sweetened whipped cream and scattered Oreo pieces creates that irresistible finish.
The rain was tapping against my kitchen window last November when I decided I needed something rich enough to make everyone forget the gloomy weather outside. I had Oreos in the pantry and peanut butter on the counter, and suddenly it clicked—this combination had to happen. My roommate walked in mid-assembly and literally stopped in her tracks, asking what smelled like heaven. That first slice disappeared faster than I could even put the pie plate down.
I brought this to our annual Friendsgiving last year, tucked between two fancy store-bought cakes that looked way more impressive. Within ten minutes, the peanut butter pie was gone while those cakes sat there untouched. Three people actually texted me the next morning begging for the recipe, and now it is the one thing I am explicitly required to bring to every single gathering.
Ingredients
- 24 Oreo cookies: The filling inside the cookies is actually part of what makes the crust hold together so beautifully
- 5 tbsp unsalted butter, melted: I have tried salted and it works but unsalted lets the chocolate shine without competing flavors
- 1 cup creamy peanut butter: Room temperature makes such a difference for smooth blending with the cream cheese
- 8 oz cream cheese, softened: Leave this out for at least an hour because cold cream cheese creates stubborn lumps
- 1 cup powdered sugar: This sweetens without making the filling grainy the way granulated sugar would
- 2 cups heavy whipping cream divided: One cup goes into the filling for lightness and the second cup creates that dreamy topping
- 2 tbsp powdered sugar: Just enough to sweeten the whipped cream without overpowering the peanut butter
- 4 Oreo cookies crushed: These are not optional—they are the textural contrast that pulls the whole dessert together
Instructions
- Building the chocolate cradle:
- Preheat your oven to 350°F and pulse those Oreo cookies in a food processor until they resemble fine black sand. Pour in the melted butter and pulse again until everything is evenly coated, then press the mixture firmly into your pie dish using the bottom of a measuring cup for even pressure. Bake for just 10 minutes to set everything in place, then let it cool completely while you make the filling.
- Creating the creamy heart:
- Beat the peanut butter and softened cream cheese together until absolutely smooth with no lumps remaining. Sprinkle in the powdered sugar and mix until fully incorporated, then whip one cup of heavy cream in a separate bowl until stiff peaks form. Gently fold that whipped cream into the peanut butter mixture in three additions, being careful not to deflate all the air you just worked so hard to create.
- The patient part:
- Spread that silky peanut butter cloud over your completely cooled crust and pop it in the refrigerator for at least two hours. This chilling time is non-negotiable—I once rushed it and ended up serving pie soup instead of pie.
- Adding the crowning glory:
- Whip the remaining cup of heavy cream with the extra powdered sugar until you have those perfect stiff peaks that hold their shape when you lift the beaters. Spread or pipe this over the chilled pie however you like, then scatter those crushed Oreos over the top right before serving so they stay crunchy.
 Save
Save Last summer my niece helped me make this for her birthday, and she was so proud when everyone sang the pie praises instead of the cake. Now every time she visits she asks if we can make the special pie together, and honestly those moments in the kitchen together taste even better than the dessert itself.
Making It Your Own
Sometimes I swap in crunchy peanut butter for extra texture, especially when serving peanut butter fanatics who appreciate the little bits of nuts throughout. A drizzle of melted chocolate over the whipped cream transforms this into something that looks like it came from a bakery window.
Timing Tricks
You can make the crust and filling up to two days in advance, just wait to add the whipped topping until a few hours before serving. I once made everything the night before and added the topping fresh the next morning, and it held up beautifully through an entire afternoon party.
Serving Secrets
This pie cuts cleanest when you dip your knife in hot water between slices and wipe it clean. Serve it slightly chilled rather than ice cold for the creamiest texture.
- Warm your knife in hot water for restaurant-perfect slices
- Let the pie sit on the counter for 10 minutes before serving if it has been in the fridge all day
- Store any leftovers covered tightly—they will keep for three days though they rarely last that long
 Save
Save Every time I make this pie, I am reminded that sometimes the simplest combinations are the ones that bring the most joy to the table.
Recipe FAQs
- → Can I make this peanut butter pie ahead of time?
-
Absolutely! This dessert actually tastes better when made a day ahead. The flavors have time to meld together, and the texture becomes even creamier. Simply prepare as directed, cover tightly, and refrigerate for up to 2 days. Add the whipped cream topping and crushed Oreos shortly before serving for the freshest presentation.
- → What type of peanut butter works best?
-
Creamy peanut butter creates the smoothest, most luxurious texture for the filling. However, you can substitute crunchy peanut butter if you enjoy extra texture and nutty bits throughout. Just be sure to use a mainstream brand rather than natural separated peanut butter, which can affect the consistency.
- → Can I freeze this pie for later?
-
Yes, this pie freezes beautifully! Wrap the assembled pie (without the whipped cream topping) tightly in plastic wrap and foil, then freeze for up to 2 months. Thaw overnight in the refrigerator before adding the fresh whipped cream and cookie garnish. The texture remains remarkably creamy after freezing.
- → How do I get clean, perfect slices?
-
The key is thorough chilling—let the pie set for at least the full 2 hours, but overnight is even better. Run your knife under hot water and wipe dry between each slice. For picture-perfect portions, you can also dip the knife in hot water then coat it with a tiny bit of oil or spray before cutting.
- → Can I make this dessert gluten-free?
-
While traditional Oreos contain wheat gluten, several brands now make gluten-free chocolate sandwich cookies that work perfectly as a substitute. Look for certified gluten-free varieties, and the rest of the ingredients are naturally gluten-free. The texture and flavor remain just as delicious with this simple swap.
- → What's the best way to crush the Oreos for the crust?
-
A food processor creates the most uniform fine crumbs in just seconds. Alternatively, place the cookies in a sealed freezer bag and crush with a rolling pin or heavy-bottomed pan—this can actually be quite satisfying! For the coarse garnish topping, simply break a few cookies by hand or give them a quick pulse in the processor.